Toy gorilla with bananas

Bananas for Bioplastic

We’ve heard recently that the ocean gyres where waste plastic is accumulating are larger than we thought, and plastic particles are now showing up in just about everything. Some believe that by 2050 there could be more plastic in the sea than fish. We’re getting in a bit of a pickle, here.

Corpse of an albatross chick, showing plastic stomach contents

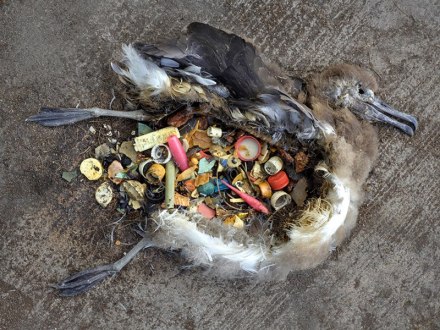
Albatross chicks are starving to death, their stomachs filled with plastic waste. This is just one consequence of our love affair with plastics.

The UK can no longer avoid addressing its waste problems by exporting material to China: the government of the People’s Republic has brought in a ban, and already material is backing up in UK waste facilities. If 500,000 tonnes of waste plastic can no longer be sent ‘away’, what will happen to it?

In the short term, local authorities are going to find that disposal becomes very expensive. The UK waste industry simply doesn’t have the capacity to process the waste that will no longer go to China – and probably won’t have for several years.

In January, UK Prime Minister Theresa May announced a plan to eliminate the UK’s plastic waste by 2042, but can we really spare a quarter of a century before we go closed-loop and/or plastic free? You’d be forgiven for thinking that a quarter of a century suggests a parliament cynically kicking the can on down the road instead of getting to grips with the problem. Where is the roadmap for eliminating plastic waste? How will it be done? What might be the first piece of the puzzle has been revealed today, with the news that we can expect a deposit scheme for drinks bottles.

The European Union also has a strategy for plastics but it’s absolutely brand new – adopted on January 16th, 2018. It’s better than the goal for the UK in that it sets a closer target (2030) but thus far their documents appear to be very informative in detailing the problems, but far less specific in setting out solutions.

Personally, I think that one key element of a future in which we aren’t drowning in our own plastic waste is for bioplastic to become the norm – not just for big corporations with secret recipes in shiny steel vats, but for ordinary small businesses.

Where is the open-source recipe for a bio-based plastic that allows small businesses to replace their petroleum-based plastic products with something made from food waste, or agricultural byproducts?

By way of conducting a straw poll, I opened Apple’s ‘Maps’ application, centred on my home town, and used the ‘search’ function. The nearest business with ‘bioplastic’ in its name… was in Rome. I tried ‘biopolymer’ instead… and found a business in Montabaur, Germany. ‘Biobased?’ … three businesses in the Netherlands. In my neighbourhood it appears that the bioplastic revolution is going to be a long time coming.

I’ve been searching for something that would enable a grassroots bioplastic industry since 2014. Admittedly, it’s only an occasional hobby and not a research project as such, but I’ll try any homebrew bioplastic recipe I can find.

My latest web search revealed one that I’d never heard of before, made from banana peel. Needless to say, I added the ingredients to my weekly shopping.

The recipe comes to us courtesy of Achille Ferrante, and a Youtube video that you can see here. To summarise, you blend some banana peel, mix with water and boil for five minutes. You drain off the excess water, and then combine with vinegar, cinnamon, thyme and honey. A second application of heat brings about polymerisation, after which you squeeze the mixture into flat sheets and then dry it.

I undertook the procurement phase from memory, and bought parsley instead of thyme. (I blame Simon and Garfunkel.) Fortunately, we had some thyme in the house already, so I was able to proceed with the experiment. (The thyme is there as an anitfungal agent, something that I think is a highly desirable component: it’s not fun when bioplastic goes bad on you.)

First off, I ate three bananas. No hardship there! Some commenters in the online banana bioplastic community (a niche group if ever there was one) have suggested that the bananas should still be green, as the skins contain more starch at that point. That may be so, but I wasn’t prepared to eat under-ripe fruit. I reckon you could lob some cornflour into the mix if you really thought that more starch was needed, anyway.

Next, I cut up the banana skins, throwing away the ‘woody’ bits at the ends. The rest was blitzed in a blender. The next step in the instructions was to add water, but I found it simpler to put the water straight in the blender, as it made the banana mulch blend more readily. Given that the end result is meant to be a ‘fibrous bioplastic’ I chose not to blitz the banana peels into a complete ‘smoothie’, reasoning that some of its strength would likely come from embedded fibres.

Banana peel in a blender

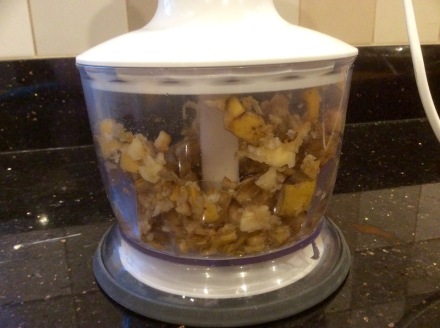
The banana mulch tended to cling to the sides of the blender, defeating my efforts, so I added the water early.

Banana peel and water, being simmered

The smell of banana peel smoothie as it simmers is surprisingly good.

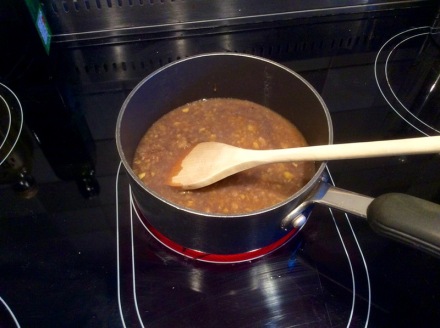
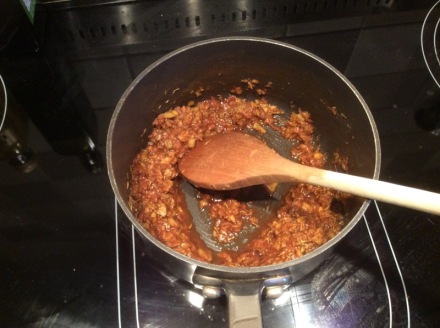
The mixture was then simmered on the stove for about five minutes, and could be seen to thicken. When the time was up I strained it, and pressed out as much water as possible. This left a thick paste, which I weighed.

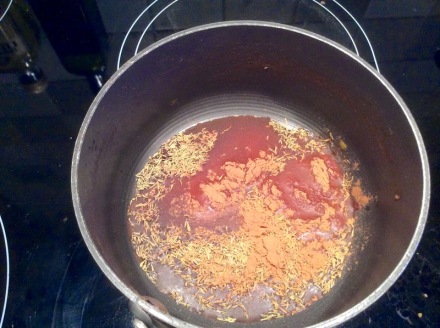
Following the instructions, for each forty grams of banana peel paste I added 20ml of vinegar, a teaspoon of thyme, a teaspoon of cinnamon and a teaspoon of honey. Everything goes in a saucepan and is mixed together over a medium heat.

Honey, cinnamon and thyme, ready for mixing

One of the disappointments about banana peel bioplastic is that it requires quite a lot of ‘real food’ in addition to the waste material.

What I like about banana bioplastic is that it’s all ‘food’. You don’t have to worry about getting hold of a cheap saucepan or baking tray for your experiments, because you’re not using anything toxic. (Remember the milk plastic from my early experiments? To harden that properly you need formaldehyde…)

What I absolutely loved about making banana bioplastic was the smells in the kitchen: bananas, cinnamon, thyme and honey… what’s not to love? (Oh: the vinegar, maybe.) The problem with all this is that unlike a normal kitchen activity you don’t get anything to eat at the end. It may be a good idea to make the bioplastic in parallel with a regular baking activity – not least because then you’d get a hot oven for “free”, reducing the energy invested in the project.

The mixture is heated again, and stirred.

Delicious smells during the final heating phase. Wishing I was making cookies instead of bioplastic…

One obvious problem is that there’s an awful lot of ‘food’ in this bioplastic. Sure, I don’t eat banana skins, but herbs, spices and honey all cost money. Bioplastic made in this way demands a debate very similar to the one about biofuels that are grown in place of food crops: the industry would be difficult to justify on a hungry planet. (Even banana skins have food value as they are fed to pigs in some places.)

There’s also a lot of energy used in the processes I followed, but I won’t worry too much about that on the grounds that we’re doing this for science, and not in volume production. No doubt some efficiencies could be found if this were being made into an industrial process.

For science!

Next comes the bit that always makes my heart sink a little: drying time.

You see, where I come from, plastics don’t need to dry: thermoplastics liquefy when you apply heat, and they solidify obligingly when the temperature falls below their melting point. Air drying is not required. Until we can work out a way to substitute plants for petrochemicals without requiring alterations to manufacturing processes, we haven’t really succeeded.

But this is a stovetop bioplastic, so I had to follow the instructions and dry it.

Banana bioplastic on baking parchment.

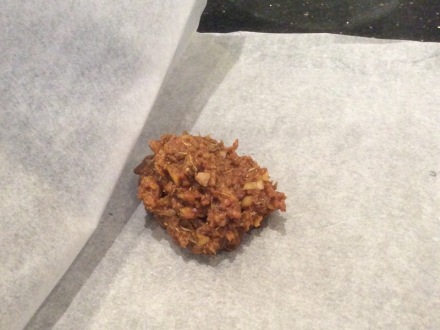
Squish your bioplastic between some baking parchment, and place in the oven at 50°C for… about an eternity, as far as I can tell.

As instructed I put the mixture in the oven at 50°C, for 45 minutes. It was still just a warm, wet mess at this point, so I gave it another half hour. When it still wasn’t dry I switched to fan oven mode, reasoning that this ought to take away the moisture faster. The alleged bioplastic was barely stronger than cookie dough at this point, and my efforts to turn it over produced some breakage. I reshaped some of my test pieces from broken oddments this point, to see how workable it was. I found it to be sticky, but it was possible to shape the material.

Eventually I tired of waiting for the mixture to dry and increased the oven temperature to 100°C (not using the fan function). After half an hour the flat sections were noticeably drier, and had taken on a leathery feel. I turned them over and gave them another twenty minutes, then switched off the oven and left them in overnight.

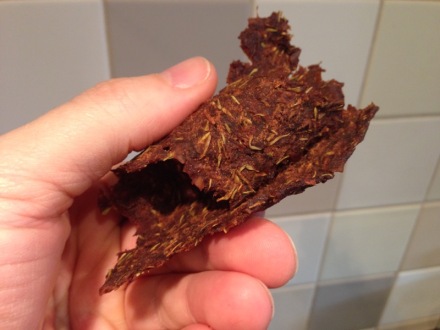
In the morning, the thin sections were completely dry, but the larger pieces I had shaped were still a bit sticky. That’ll be the honey, I suppose. This would appear to be one of those “thin film” bioplastics, therefore.

I’m pleased to report that the flat samples really are plastic in nature, with flexibility and a surprising amount of resilience. Their fibrous nature seems to come overwhelmingly from the thyme, which can be seen throughout the material, rather like that old woodchip textured wallpaper we used to have in the seventies. In future I might try chopping the thyme up so that it doesn’t introduce so much roughness. Some bioplastic hackers suggest that thyme oil might be better, although this would introduce more moisture, so I think you’d need to experiment to get this right.

I was skeptical about this material: I suspected that I would simply find a mass of fibres, baked into a matrix with the honey acting as a ‘glue’ but I was wrong: the sheet of banana material really does behave like plastic. 

When bent, it flops around, showing a surprising amount of flexibility. That honey really has served as a plasticiser. It’s not what I’d call a durable material, but I’d say it’s more durable than I expected. (You won’t be sewing yourself a pair of bioplastic moccasins with this stuff.) Analogy for the purposes of conveying its engineering properties: it’s about as strong as fruit leather. (Funny, that…)

Bioplastic sample being rolled tightly.

Surprisingly tough, flexible bioplastic. Now, what are we going to do with it?

One highly desirable property is that it smells great! The cinnamon banishes any hint of the vinegar smell that we experienced with the milk plastic.

I don’t know what you’d actually do with this bioplastic, though, and that’s a worry. You could make biodegradable planting pots that turn to compost, maybe… but you can make those out of compressed peat, or even waste paper. That’s got to be better than faffing about with honey, cinnamon and all that cookery. Also, I think you’d need to raise your pest control game if you’re planning on leaving yummy cinnamon bioplastic in your garden…

This is a bioplastic solution still looking for a problem, then. It’s great stuff and I really enjoyed the experiment. I think we can learn a lot by copying the process shown in Achille Ferrante’s video… but we’re not going to start making genuinely useful home-brew toys or gadgets from it.

Readers may have better ideas for applications?

On the day that I made bioplastic, I put at least three plastic bottles in the recycling bin. After a single use, I’m giving away far better materials than I’m able to make from plant matter. Stable, strong, colour-fast petrochemical plastics that (for now) cost very little. Bioplastic still has a long way to go if it’s ever going make inroads into our plastics habit.


Update for October 24th 2018… some seven months later: the banana bioplastic that I made is still about as tough and flexible as before. That’s quite an achievement given how conventional plastics become more brittle over time, as their plasticisers evaporate away. (I haven’t been leaving the stuff in sunlight, though.) There hasn’t been any noticeable shrinkage, and none of the mould growth that has destroyed the products of my other experiments. This one deserves further study – as long as it’s thin sheets of leathery plastic that you are looking for!

When Bioplastic Goes Bad

Time to try another recipe for bioplastic. I’m still hoping to find a simple, affordable material that can be made from waste ingredients (so we don’t use oil for trivial products) that rots away when no longer required… and that could be manufactured in a cottage industry.

The third recipe for bioplastic that I tried was “microwave bioplastic”, which is typically made from cornstarch (1 tbsp), water (1 tbsp) and vegetable oil (two drops). Bioplastic doesn’t come much simpler than this, nor much quicker. A microwave oven is used to heat the mixture for twenty seconds or so, and then you knead the result, and mould it into shape… and you’re done.

I made a small ball of the material, and set it aside to dry. Once again, it appears we’re looking at a thermosetting process here: the bioplastic doesn’t simply harden as it cools. It took about a day to set, and the ball split apart as it dried. The fragments were hard, like a ceramic, making the first time I’ve been able to report a material with the kind of strength that would be sought in many plastic products… but my sample had distorted beyond any kind of usefulness.

Microwave bioplastic ball

Microwave bioplastic: surprisingly hard… but hopelessly distorted during drying.

“Don’t let it dry too quickly,” is the advice from the Internet bioplastic community. The problem of splitting in microwave bioplastic is well known. I kept the next sample under wraps, with just a few air holes. After a week…

Microwave bioplastic cup, decomposing

Something is rotten in the state of bioplastic

My bioplastic, deliberately kept moist to prevent splitting apart, had begun to rot even before it had dried. I removed the plastic covering and left the festering thing to compost itself… and it promptly split apart.

Microwave bioplastic, broken apart

Not all things that are furry are cute.

Verdict: this isn’t the bioplastic we’re looking for.

It’s said that bad doctors get to bury their mistakes, while bad architects can only recommend that you plant a row of trees. Bad bioplastic engineers have the best of all possible worlds: the evidence of their mistakes removes itself – and surprisingly quickly.

Another day, another bioplastic

The story so far: I’m making occasional efforts to follow recipes for simple stovetop bioplastics, found on the Internet. I’m hoping to learn enough about the possibilities to be able to find a simple, affordable one that can be made from abundant materials, and substituted for conventional oil-based materials.

Just imagine the benefits if a material could be identified that is renewable, and biodegradable. If processing was simple enough that anybody could set up a business to make the stuff, and if it was inexpensive enough to be used in packaging? We could make litter a thing of the past… and stave off the problems of oil depletion.

In my first test, the casein plastic had been a disappointment… but who wants to make artefacts out of curdled milk, anyway? My next effort was with a starch-based bioplastic, consisting of cornflour, vinegar, gelatin and water. That’s two ingredients out of the kitchen cupboard, one from the tap, and one from my local pharmacy. Gelatin is the one you’re least likely to have on hand, although it’s inexpensive and renewable – a byproduct of soap manufacture, used in baking and the like. (You needn’t worry that going into the pharmacy and asking for gelatin is going to make them think you’re running a drug lab, or something…)

The ingredients were combined:

  • one tablespoon of cornstarch,
  • four tablespoons of water,
  • a teaspoon of glycerin, and
  • a teaspoon of vinegar.

(It’s said that varying the quantity of gelatin used affects the stiffness of the plastic… adding a variable to the already somewhat imprecise bioplastic recipes I’m finding…)

Everything was thoroughly mixed, while cold, and then stirred vigorously while heat was applied. (I added some food colouring at this point, just for fun.) You know it’s polymerising when it turns into a semi-translucent gel, and begins to form clumps. Presently, it starts to bubble, and it’s time to remove it from the heat. You’re left with a substance that only the special effects director in a science fiction movie could love.

And then? Then you pour it out of the pot, and spread it on a non-stick surface. Once again (as with the casein plastic) it’s time to play the waiting game: the plastic must dry.

Not cool, but dry. My disappointment with bioplastics looks set to continue, as the industrial applications for a plastic that has to dry like plaster seem somewhat limited… but that’s the way things are, at least with this particular material. In any case, I decided to try the material and report on what I got.

I’d made a double-sized batch, which may have been a mistake. I spread it out as best I could in a non-stick over tray, covering it to a depth of about 5mm. This thickness will have affected the drying time; after three days I still had clammy, weak bioplastic, with all the engineering properties of jelly.

Weak, flabby and cracking up... and my bioplastic’s not much use either.

Weak, flabby and cracking up… and my bioplastic’s not much use either.

At the same time, the material revealed its Achilles’ heel: it shrank as it dried, not just becoming a thinner deposit, but cracking like a lakebed in a drought. Some pieces curled up at the edges as they dried, too. Other people have had greater success with this material, producing large, thin sheets that resemble plastic bags. That’s not a bad idea, substituting for plastic bags with a biodegradable and renewable alternative… but it seems I will have to look elsewhere if I want to make three-dimensional products from bioplastic.

Thin deposit

Thin deposits of the material were soon dry, and proved surprisingly strong.

Eventually, the plastic became quite durable, although the random fractures from the drying phase will likely pose a problem if one is trying to make regular shapes, rather than just bioplastic ‘crisps’. (If you can think of a use for bioplastic crisps, let me know: I can supply them in quantity.)

Bioplastic crisps

Bioplastic crisps. Not manufacturing’s finest hour, to be honest.

A point is reached where this plastic loses its flexibility, and you’re left with rigid pieces that are about as durable as if you made them from Fimo… with the advantage of there being no oven baking stage, but on the downside having a long drying time, and the problem of cracking – both problems apparently absent when the plastic is made in very thin layers.

Now, having gone to all the trouble of making this bioplastic, naturally I set about making it rot away to nothing. In an indoor environment, the plastic seems to survive more or less indefinitely. Sustained contact with a small amount of moisture had the effect of washing some of my food colouring out of the plastic, but didn’t otherwise spoil it, while strong sunlight seems to have caused the plastic to fracture internally. Previously translucent sections developed fissures internally, looking like opaque flakes, and scabs of the material began to break away.

Degrading bioplastic

The material lasted indefinitely while indoors, but left outside for just a week, this piece is beginning to break up.

This rapid biodegredation is an intriguing possibility for a fast food container, or somesuch… although not with any manufacturing process I have yet been able to conceive of. (Maybe something like slip casting, as it’s used in pottery?)

Time will tell. If anybody has advice for amateur bioplastic hackers such as me, the comments section is open…


Update:

July 2020. I happened to find the samples that I described above as “bioplastic crisps.” I had stored them in a reasonably cool, dark place and they hadn’t degraded at all. Colour, strength and flexibility were unimpaired, despite the intervening three years. I’m now experimenting to see if sunlight alone will cause the plastic to break up, or if moisture is essential.

Bioplastic Revisited

Undaunted by the difficulties encountered during my first experiment with a home-made bioplastic, I determined to keep on trying. The story so far: I’m hoping to be able to recommend to my readers a bioplastic that might be made easily from abundant or waste material, that can be substituted directly for an oil-based material, and that is biodegradable.

Now, obviously the simplest way to meet these requirements would be by desk research, but I decided that for once “seeing is believing”. I’m intrigued by the amateur bioplastic scene because this seems more likely to make a new contribution towards sustainability. I’m thinking that a resource-poor country could really benefit from a grassroots bioplastic revolution, so I’m less interested in high-tech solutions, and more in what can be demonstrated by stovetop hackers. This led me to attempt to make some ‘milk plastic’, but the results were less than satisfactory: I produced a material that exhibited significant shrinkage and distortion during drying, and that I found very difficult to mould, while producing parts of very limited strength. I did some additional research in an effort to find out what might have gone wrong, and discovered new advice that I should use a cheesecloth to squeeze excess moisture out from the curdled bioplastic, and then ‘knead’ the material for a while. This is at odds with the instructions I had got from the Smithsonian, which said to leave some moisture in, to prevent cracking. I’m finding most bioplastic recipes very vague, and in some cases contradictory. Experimentation is required!

Further reading revealed that the scientific name for ‘milk plastic’ is casein plastic. The Plastics Historical Society provide a good deal of information about its commercial use, and I was surprised to learn just how long ago it started, being patented in 1899. Galalith (sometimes marketed as Erinoid in the UK) was used to make buttons, pen barrels, knitting needles, knife handles, buckles…

Casein buttons

All kinds of useful gadgets. But mostly buttons.

What? That stuff I found to be about as durable as chocolate, and far more difficult to mould, due to shrinkage? How could that be strong enough to make knitting needles? The secret (as discovered by French chemist Auguste Trillat) comes from hardening it by soaking in a 5% formaldehyde solution for a long period. This isn’t something that you’ll find the stovetop bioplastic enthusiasts doing, and rightly so since formaldehyde is carcinogenic. Still, when so treated, the material becomes surprisingly durable; it polishes up well, and dyes very well, to produce some distinctive pastel colours that were characteristic of the interwar period.

If you do happen to soak your milk plastic in a 5% formaldehyde solution (for up to a year, for a piece 25mm thick) it turns rigid – but while doing so, the material shrinks and distorts. Fine moulding while it’s in the plastic state is therefore impractical and most Galalith products had to be machined from solid sheet or bar, rather as we do with certain low-volume production runs today. By 1928 a process was developed whereby the material could be moulded directly into buttons, which reduced cost and opened up possibilities for new shapes. Casein plastic buttons had found their niche, being better than other early plastics in terms of surviving the rigors of washing, dry cleaning and ironing.

I’m reminded of a (frankly awful) verse from 18th century poet and physician John Armstrong, whose tribute to Cheshire cheese (!) saw it described as “tenacious paste of solid milk”. If you’re a vegan, you probably don’t fancy the idea of your buttons or the handles of your cutlery being made from this particularly tenacious form of milk, but keep in mind that in 1899 materials commonly used in the manufacture of household goods still included ivory, bone and horn, so perhaps Galalith was the lesser of two evils.

The manufacture of goods from Galalith halted during the Second World War, when milk was needed for feeding hungry populations, and the development of new materials had rendered it largely obsolete by the time supplies were restored. Nowadays, only very low volumes of specialist buttons are made this way.

With all these limitations, we can forget about casein plastic being a sustainable solution. The need to harden it with a carcinogenic chemical is a major obstacle, while batch manufacture that takes up to a year (and still requires subsequent machining) just about disqualifies it. I turned my attention to starch-based biopolymers instead.

Meanwhile, the bioplastic ‘Volkswagen Polos’ that I had made using an ice cube took a week to dry right through, shrinking and distorting as they did so. The early 20th century solution to this would have been to start out with a much bigger lump of material, and to have machined it down to the desired shape after a long soak in formaldehyde solution. I chose instead to leave my failed experiments out in the garden to see how long it takes for the action of sun, rain and microbes to turn them into compost.

The ice cube tray VW Polo...

The ice cube tray VW Polo. The pale upper parts failed to fully set while within the mould cavity. Poor workability means this is no substitute for modern plastics.

...a disappointing bioplastic experiment.

When fully dried, much of the shape had been lost: a disappointing first attempt with bioplastic.

Sieve

A Stovetop Bioplastic Experiment

A little while ago I wrote that you could make bioplastic, and that it was simple to do so. There are plenty of websites that tell you this, and countless chirpy teenagers demonstrating various techniques on YouTube… but I decided I’d better put the whole thing to the test.

For my first experimental bioplastic , I tried polylactic acid (PLA) – simply because I had some milk left over and it wasn’t going to last much longer. I used a recipe provided by the folks at the Smithsonian, which appealed to me because of its simplicity. Later, I’d try some things that required me to buy ingredients, but for this one all I needed was milk and a little vinegar.

Selecting an old saucepan (just in case something horrible was produced – it wasn’t) I warmed up the milk to the point where velvety bubbles were just beginning to appear. Meanwhile, I mixed in some food colouring, to make things more interesting. Then I added vinegar, in a ratio of one tablespoon of vinegar to one cup of milk. (Why do American recipes always use the ‘cup’ as a unit of measure? Which cup? They’re all different sizes…)

Pan of milk, vinegar and food colouring.

Bioplatic. It’s what’s for dinner.

I kept on stirring, and pretty soon the mixture polymerised… which is a nice way to say that it curdled, just as if I had added lemon juice to cream when cooking. The result was a vile-looking mixture of thin, clear liquid and small rubbery chunks with the consistency of cottage cheese. The chunks were what I was after.

I poured the whole lot through a sieve, to retain the chunks. Some of the smaller chunks slipped through and I had a momentary panic that I was pouring plastic down the drain, where it might clog… then I remembered that this is bioplastic, so it can be depended upon to rot away quite quickly. Score one point for home-made bioplastic!

Sieve

I would estimate that I got about 10% chunks, 90% waste liquid.

I scooped the chunks out of the sieve and dabbed at the mixture with kitchen roll to remove excess liquid. Then I thought, what on Earth am I going to do with this bioplastic anyway? A quick search of the kitchen revealed an ice cube tray (a promotional freebie that makes ice cubes in the shape of VW Polos) so I decided to make some bioplastic Polos. I spooned the chunks into the cavities and pressed it down as best I could: the process was nothing like any plastic moulding I’ve done before, and that was a disappointment: I’d read that bioplastics could be substituted for oil-based plastics in existing processes. Not this one… or at least, not with this recipe.

Ice cube tray

Who knew you could make VW Polos from bioplastic?

One of my concerns was that this experiment would smell really bad. I don’t like milk very much at the best of times, and heating it and then leaving it around the house for several days really didn’t seem like a good idea. I’m pleased to report, however, that the only smell coming from the experiment after two days was a faint smell of vinegar.

Now, something that has surprised me in many of the bioplastic recipes I’ve read is a requirement to let them dry. They set over time, it seems. That’s another disappointment, because it reduces their utility a little… but perhaps I could make some bioplastic, let it ‘dry’ and then soften it with heat and mould it like a regular thermoplastic? Well… we shall see. I suppose that’s my end goal in these experiments: to identify an easily-made, biodegradable plastic that can be substituted directly for something like polystyrene, or PET. Imagine the benefit if an existing waste material such as food industry byproducts could be used to make packaging, reducing dependency upon oil imports and simply turning back into soil at the end of life!

The ‘milk plastic’ exhibited a tremendous amount of shrinkage as it dried. The ‘ice cube’ VW Polos became a lot narrower (around 25%) as they dried. Clearly, there was a lot of liquid left in the mixture, and it all had to evaporate away. This is a problem because working with PLA in this way seems to be a race against time: will the plastic set before it biodegrades? Again, I don’t really want rotting milk products around the house.

Mould shrinkage

Nasty shrinkage – at least 25% – during drying.

The ice cube tray proved to be a poor choice of mould, as it inhibited drying. After two days, I tried to dig the first Polo out of the tray, and found that it was still gooey inside. A better result came from some surplus bioplastic that I had left on a porous surface; it dried much more thoroughly, and shows no sign of decomposing. Best of all, once dry, it had no smell.

Dried bioplastic

To quote Lord Percy Percy: “A nugget of purest green!”

The strength of the material was nothing spectacular: I would estimate it was about as strong as a wax crayon: not much use for an industrial application, then. You might manage to make plant pots out of the stuff (so that seedlings can be put in the ground without removing them from the pot) but you can do that with fibrous pots made from pressed peat anyway. Another issue with this bioplastic recipe is that it isn’t really ‘green’ enough – milk is produced by farming, which may not use sustainable methods. Also, it involves using a food in a non-food application, which isn’t really ethical while not everybody has enough.

All in all, ‘milk plastic’ was a disappointment, although a useful learning experience. It took time, effort and energy to produce something that had only limited practical application. Meanwhile, the milk bottle that I washed out and put in the recycling consisted of 37 grams of virgin HDPE (an oil-based plastic) that I expect will be burnt for energy recovery. I would have come closer to my goal by grinding up the milk bottle into granules, and using that in a moulding process (exactly as some 3D printing enthusiasts are now doing). The HDPE is easier to work with, stronger, chemically more stable, and simply better at virtually everything except rotting. What a waste!